You can set up a Basler GigE or USB3 camera on an NVIDIA Jetson without installing pylon or plugging in a monitor. Register the Jetson in Roboflow Deployment Manager, enter the camera’s serial number and pick a Workflow. The device handles discovery, IP addressing and reconnects, and you watch live predictions and diagnostics in your browser.
Basler cameras are a standard choice on manufacturing lines, and an NVIDIA Jetson provides enough compute to run object detection or segmentation right next to the camera with minimal latency. Integration previously required installing the pylon SDK and connecting a display, keyboard and mouse. After opening pylon Viewer on the Jetson, the capture settings and network settings would also need to be adjusted and tuned to match the system capabilities.
Roboflow Deployment Manager (opens in a new tab) handles configuration for you. You enter the camera's serial number, select a Roboflow Workflow, and the device configures the rest: ports, IP addresses, packet sizes and timings. This guide walks through the whole process, from plugging in the camera to watching live predictions in your browser.
Set Up a Basler Camera on Jetson with Roboflow
What you need to get started:
- A Jetson registered with Deployment Manager. If your device is not registered yet, follow Add a Device (opens in a new tab): create the device in Roboflow, choose Debian, and run the generated install command in a terminal on the Jetson. The installer sets up Docker and Roboflow Inference and registers the device with your account. Check the hardware requirements (opens in a new tab) first. Deployment Manager is built primarily for Orin-based Jetsons.
- A Basler camera connected over GigE (Ethernet) or USB 3.0.
- A Workflow to run on the camera's frames.
- An Enterprise plan with industrial cameras enabled. Basler and Lucid support is an Enterprise feature. Contact the Roboflow sales team to turn it on.
You do not need a monitor, keyboard, or mouse on the Jetson, and you do not need to install pylon yourself.
Step 1: Connect the camera and find it in the Cameras table
Plug the camera into the Jetson. For a GigE camera, that means an Ethernet cable to the device's camera port (through a PoE switch or injector if the camera is powered over Ethernet). For a USB3 Vision camera, use a USB 3.0 port.
In Roboflow, open Deployments, select your device, and stay on the Streams tab. Below the list of Streams is a Cameras table that shows every camera the device has discovered. Click Scan for Cameras if yours has not appeared yet.
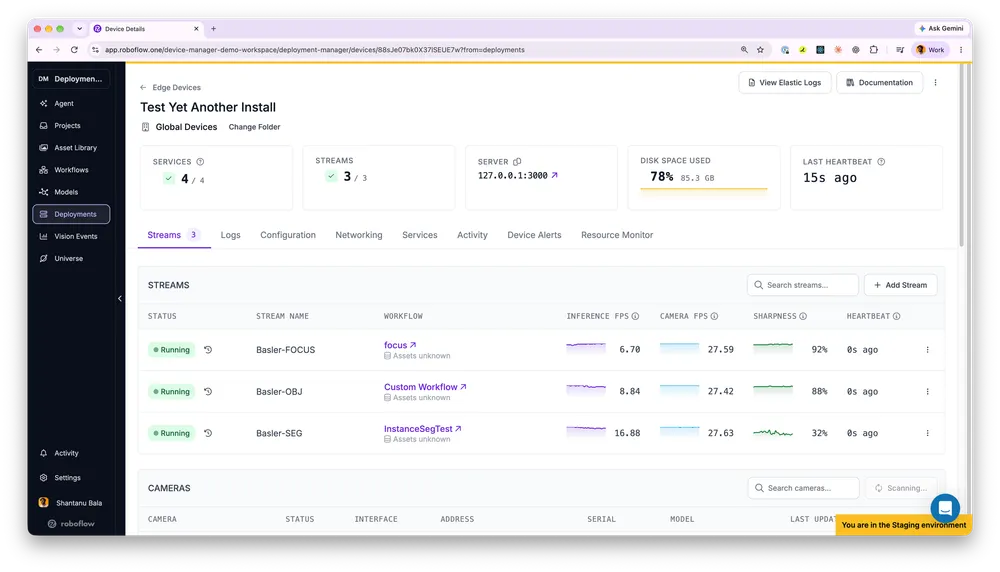
Each row shows the camera's brand, connection type, interface, IP address, serial number, and model. Deployment Manager connects to a Basler camera using only its serial number.
Four labels in this table flag a camera with a network setup needs attention:
- Network mismatch: The camera's IP does not match the port's subnet. You don’t need to do anything, because the device readdresses the camera when the Stream starts.
- Network review: The port is shared or carries the device's default route, so the device will not change the address on its own. Set the camera's IP manually (opens in a new tab).
- Set Up Camera Port: The camera needs a dedicated camera port (opens in a new tab) before it can be used.
- Never seen: A Stream references this camera, but the device has not been able to find it.
Step 2: Add a Stream
A Stream pairs one camera with one Workflow. The fastest way to create one is to click Add Stream on the camera's row in the Cameras table, which fills in the source for you. You can also click Add Stream at the top of the Streams list and fill in the form yourself.
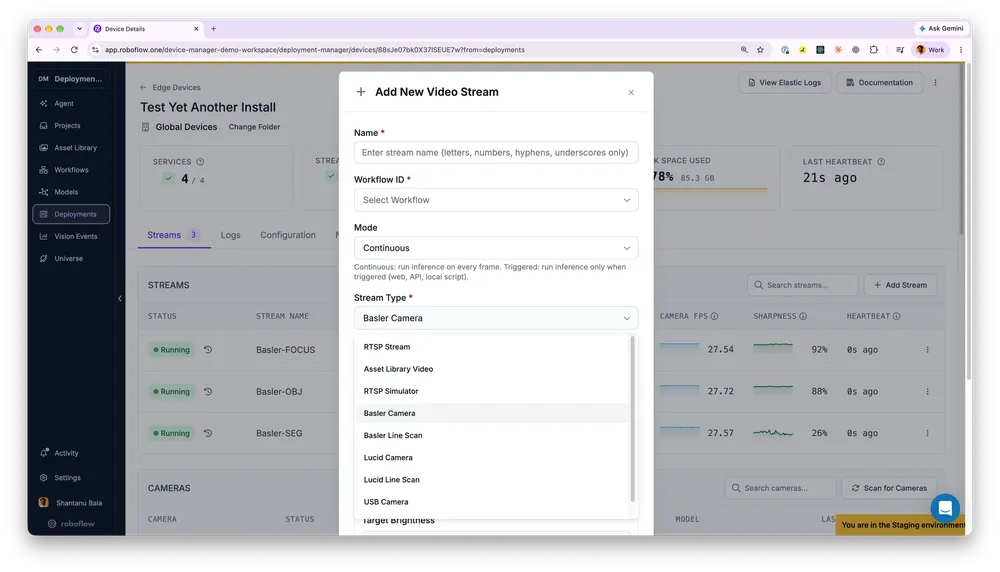
Fill out the form:
- Name: Letters, numbers, hyphens, and underscores. Names must be unique on the device.
- Workflow: The Workflow to run on each frame. If a red X appears beside this field, the Inference version on the device cannot run that Workflow. Hover over the icon to see which block is unsupported, then update the inference service version (opens in a new tab) on the device's Configuration tab.
- Mode: Continuous (the default) runs inference on every frame. Triggered runs only when you ask it to. See Trigger a Stream (opens in a new tab).
- Stream Type: Choose Basler Camera.
- Serial Number: The camera's serial number, from the Cameras table or the label on the camera body.
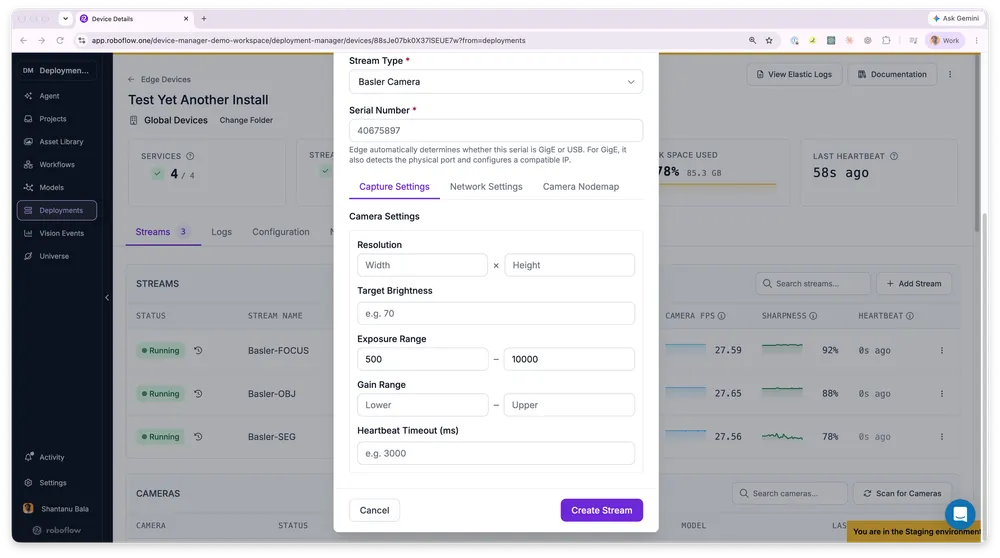
Those five fields are the whole camera configuration. The device handles IP addressing, so you never open the pylon IP Configurator. When the Stream starts, the device works out whether the serial number belongs to a GigE or USB camera. For a GigE camera, it also finds the physical port the camera is plugged into and gives the camera an address that port can reach.
Have a Stream that was set up with an IP address before serial numbers were supported? It keeps working as is. It switches to the new behavior when you enter a serial number.
Optional: network settings
The Network Settings tab lists the network changes the device makes for you. The defaults suit most installations.
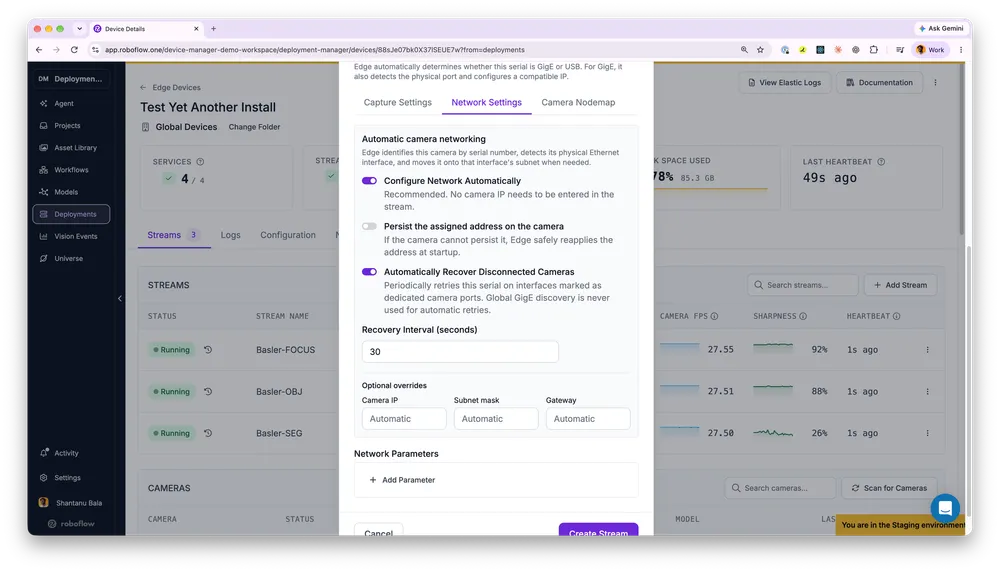
- Configure Network Automatically is on by default and is the recommended setting. Leave it on and you never enter a camera IP.
- Persist the assigned address on the camera saves the address to the camera itself. If the camera cannot store it, the device reapplies the address at startup.
- Automatically Recover Disconnected Cameras retries a lost camera on the device's dedicated camera ports at the interval you set (30 seconds by default).
- Optional overrides let you pin a specific camera IP, subnet mask, and gateway if your network requires it.
When the form is ready, click Create Stream.
Step 3: Watch the Stream come up
The new Stream appears in the Streams list with a status of Provisioning while the device downloads the Workflow and any model weights. The first deployment can take several minutes. When the status changes to Running, the Workflow is executing on the Jetson.
Click the Stream to open it. You get a live preview with your Workflow's visualizations drawn on the frame, alongside three health metrics: inference FPS, camera FPS, and a sharpness score.
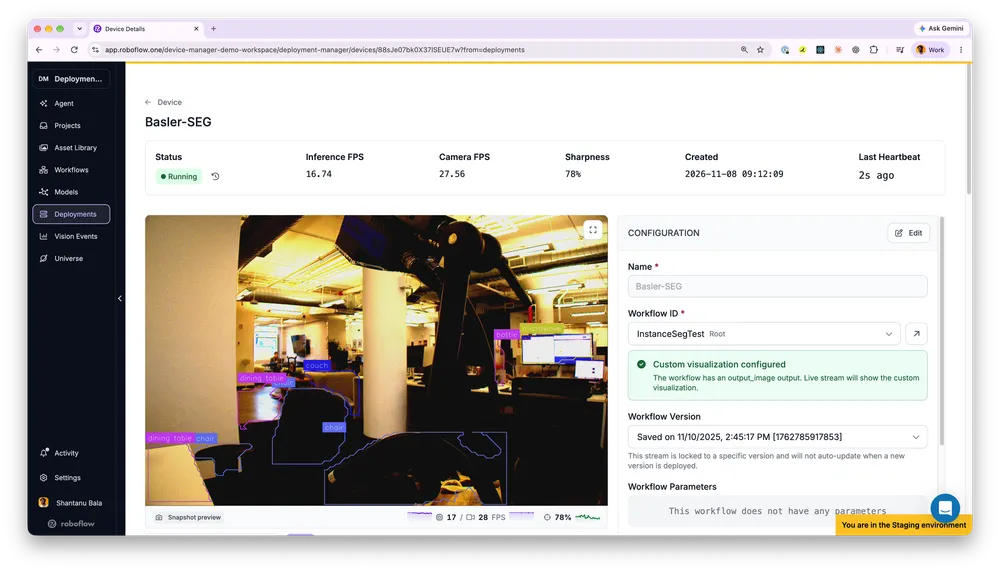
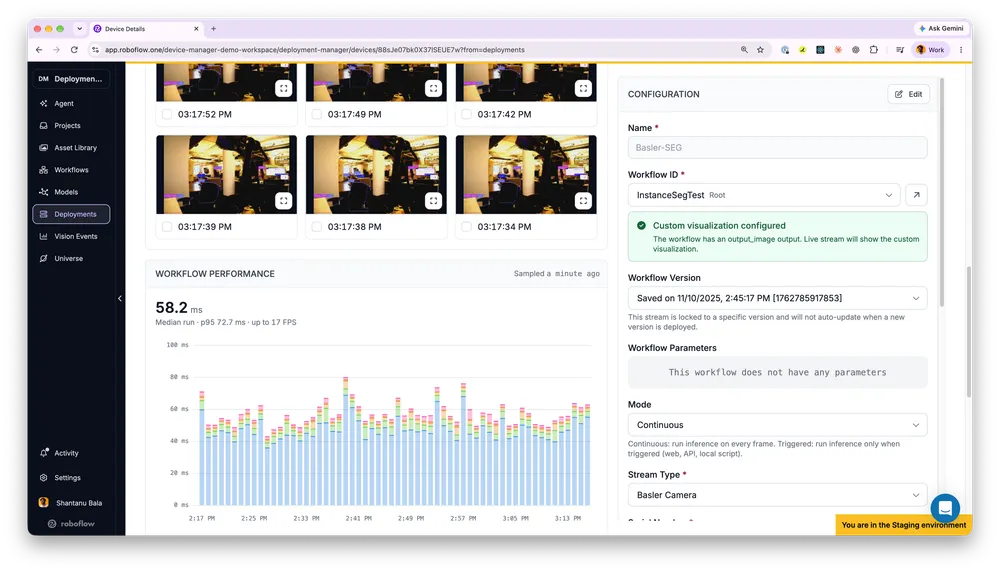
Scroll down for two more tools. Recent Frames keeps the latest frames while the page is open, and you can select any of them and add them to a Roboflow project to grow your dataset with real production images. Workflow Performance breaks down the time each block takes, so you can see what is limiting your frame rate.
Step 4: Tune the image
If the image is too dark, too bright, or larger than your model needs, click Edit on the Stream's Configuration panel. The Capture Settings tab covers the settings most deployments touch:
- Resolution (width × height)
- Target Brightness
- Exposure Range and Gain Range, the limits the camera stays within while it adjusts to hit the brightness target
- Heartbeat Timeout (ms)
For anything else, the Camera Nodemap tab lets you add pylon nodes directly, so you can still set camera features that have no dedicated field.
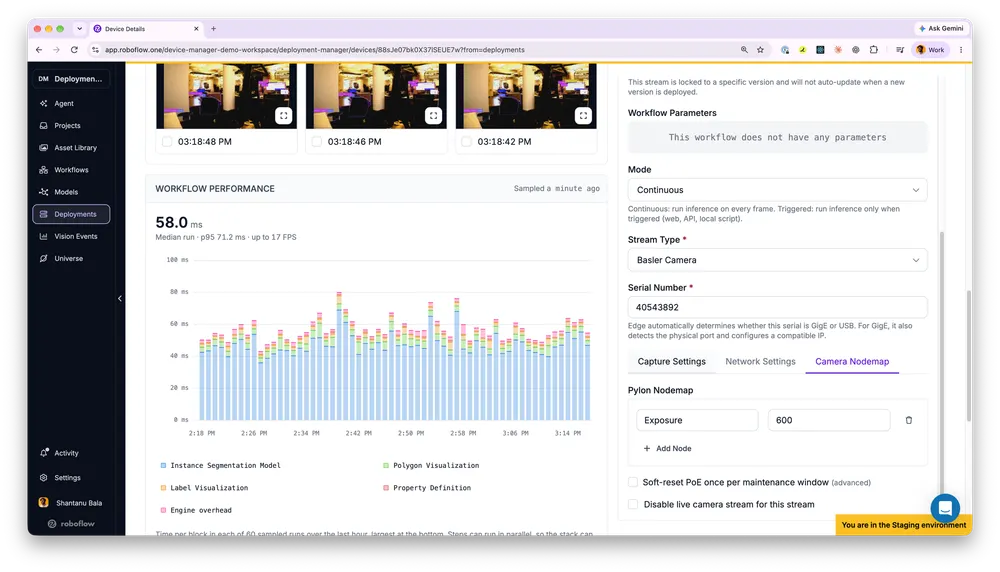
The full list of options is in Configure Camera Settings (opens in a new tab).
Troubleshooting: camera diagnostics
In the original version of this guide, a missing camera meant opening pylon Viewer and working through the GigE Configurator and IP Configurator. Now you click the camera's row in the Cameras table to open Diagnostics.
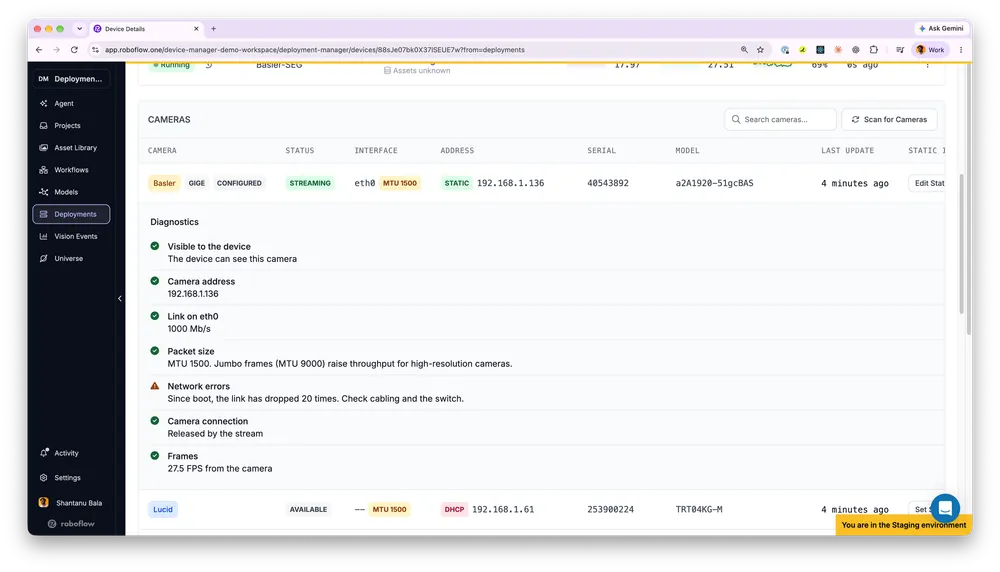
Diagnostics checks the path from the Jetson to the camera, one item at a time:
- Visible to the device and Camera address confirm the device can see the camera and which IP it holds.
- Link reports the negotiated speed on the Ethernet port. A GigE camera should show 1000 Mb/s.
- Packet size reports the port's MTU. Jumbo frames (MTU 9000) raise throughput for high-resolution cameras.
- Network errors flags link drops, which usually point to a cable or switch problem. The screenshot above includes this warning.
- Camera connection and Frames confirm that the camera is open and how many frames per second it is delivering.
When a check fails and the device knows how to fix it, a button appears next to the result, such as Set Static IP. If you need help, Copy Report copies the full set of results so you can paste them into a support request.
Going further
- For a Basler line scan camera, choose Basler Line Scan as the Stream Type and set line rate, framing, and exposure. See Configure Line Scan Cameras (opens in a new tab).
- A camera can be defined once as a shared video source and referenced by multiple Streams, each with its own Workflow and mode. This is set up through the device's configuration and requires Multiprocessing to be enabled. The steps are in the Add a Stream (opens in a new tab) documentation.
- Switch a Stream's Mode to Triggered to run inference only when a part is in position. See Trigger a Stream (opens in a new tab).
- The RTSP Simulator stream type plays an uploaded video as if it were a camera, which is useful for validating a Workflow before hardware arrives.
Get started
Register the Jetson, enter the camera's serial number, and choose a Workflow. Deployment Manager then handles discovery, IP addressing, and reconnects, and you watch live predictions and diagnostics in your browser.
To enable Basler cameras on your account, talk to the Roboflow team.